Tutorial on Installing Safe Families Free Internet Filtering Software
How to Install Safe Families Free Internet Filtering Software
Flash Video Tutorial :: click here
(Windows XP users should see Step 3 before beginning installation.)
1. Installing from the Internet:
a. Go to the Safe Families home page. Under the "free software" heading, enter your email address and click "Download."
b. When asked "Do you want to run or save this file?" click "Run." (Or, if you want to install the program later, click "Save." Later you can install the program by opening the file techblock.exe.)
c. When asked "Are you sure you wan to run this software" click "Run."
d. Click "Next."
e. Skip to Step 3.
2. Installing from a CD:
a. Insert the Safe Families CD into your computer's CD drive.
b. If a window pops up asking you "Are you sure you want to allow CDs to run active content on your computer" click Yes.
c. A window with the Safe Families home page will open.
d. To switch to the TechMission SafeFamilies We-Blocker Setup window, click on this button at the bottom of your screen:
![]()
e. You will see the following window. Click on the blue SafeFamilies link to get your free registration ID key.
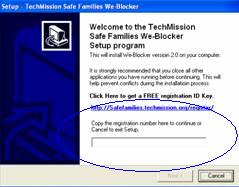
f. On the Software Registration page that opens, enter your email address and click “Register.” A new window will open with your registration code.
g. Go back to the We-Blocker Setup window and enter your registration code in the white box. Click "Next."
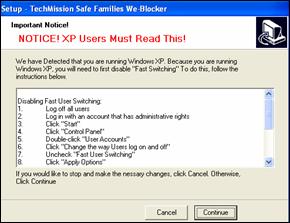
3. Windows XP users need to disable "Fast Switching." Read and follow the instructions below. Click "Cancel" to follow these instructions and apply this change. Click "Continue" if you have already applied this change or do not have Windows XP.
| To Disable Fast User Switching:
1. Log off all users. 2. Log in with an account that has administrative rights. 3. Click "Start" 4. Click "Control Panel" 5. Double-click "User Accounts" 6. Click "Change the way Users log on and off" 7. Uncheck "Fast User Switching" 8. Click "Apply Options"
NOTE: This will change how users login to your computer to the old format of login screen, so that you will no longer be able to do fast switching between users. This work-around has already been implemented for computers that are part of a domain because fast user switching will already be disabled. |
 |
If you applied this change, you will need to restart the We-Blocker installation process. Start from the beginning, and next time you reach this screen you can click "Continue."
4. Click "Start Setup."
5. Read the "Important!" screen, then click "Finished."
6. Click "OK" to enter a Master User password.
7. Enter a password that you will remember but that any youth using the computer will not be able to guess.
8. Choose your age from the drop-down menu.
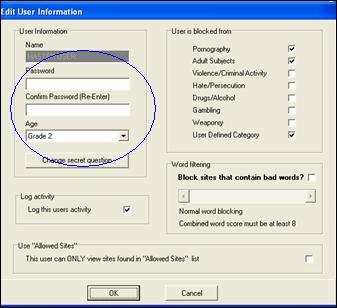
9. Check the boxes, on the rest of the screen, as appropriate to your blocking preferences.
a. Log activity: This option keeps track of all sites that this user visists and allows you to view that list.
b. User is blocked from...: We-Blocker will block sites that are pre-determined to have the content matter that you select.
c. Word filtering: We-Blocker can scan sites for foul language before they are opened and block those with a high "bad word score." (Note: this option will slightly increase page load time.)
d. Use "Allowed Sites: You can choose to allow a user to visit ONLY those sites which you select. (Create this list under the "Custom Filtering" tab of the master controls.)
10. Click "OK."
11. Click "OK" on the next two windows that open.
12. You will be asked to create a secret question. This question will be use din case you forget your password. Create a question and answer that you will remember but that others will not guess. Important: If you forget both your password and the answer to your "secret question", you will not be able to access We-Blocker controls or uninstall it from your computer!
13. Click "OK."
Your internet filtering software is now installed.
To add additional users:
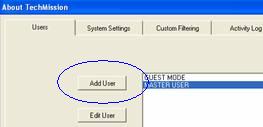
14. In the master controls window (that says “About TechMission” at the top), you can add users for each person in your family or for each type of user at your computer center (staff, youth, kids, etc.). (If this window is not yet open, click on the TechMission logo in the bottom right of your screen (in the system tray). Click “Go to master controls,” enter your password, and click “OK.”)
![]()
15. Click “Add User.”
16. Enter the name of the new user and click “OK.”
17. Enter that user’s age and the blocking preferences you want for them (see Step 14).
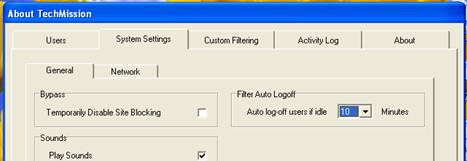
18. You can choose to enter a password or not. (For example, if you have a computer center, you may want to give your staff a password and less blocking, while children have no password and more blocking.) Note on Guest Mode: We-Blocker automatically switches to Guest Mode (logs off the current user) after the computer is idle for 10 minutes (or other time you specify under the System Settings tab). You may want to change your Guest Mode settings to those of your most restricted user.
To switch between users:
19. To change the current user, click on the TechMission icon (see Step 18), then click “Change current user.”
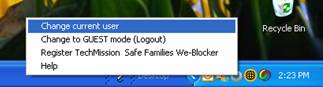
20. Choose the user you want and enter the password, if applicable.
21. To see which user is currently logged in, hold your mouse over the TechMission icon without clicking, and a box will appear.
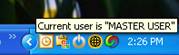
To edit user settings and other system settings:
22. To change We-Blocker settings, switch user to “Master User,” then click on the TechMission icon and click “Go to master controls.”

23. To edit user settings, click on the user account you want to edit, and click “Edit User.”

24. In the master controls window, you will also see several tabs. Click on the “System Settings” tab to temporarily disable site blocking or to change other settings.
25. Under the “Custom Filtering” tab, you can add your own blocked sites, allowed sites, and blocked words to the We-Blocker lists. (Allowed sites are the ONLY sites that a user will be able to visit IF the “Use Allowed Sites” box is checked under their Edit User Settings – see Step 9.)
26. Under the “Activity Log” tab, you will see a list of all websites that have been visited, which user visited them, when they were visited, whether or not they were blocked, and any blocked words that were found on the page.
a. If you find a website that was not blocked but that you wish to block, you can double-click on that entry. You can also double-click on a blocked website to unblock it.
b. You can clear all of the entries by clicking "Clear Log File," or save all the entries to an external file by clicking "Text Export."
